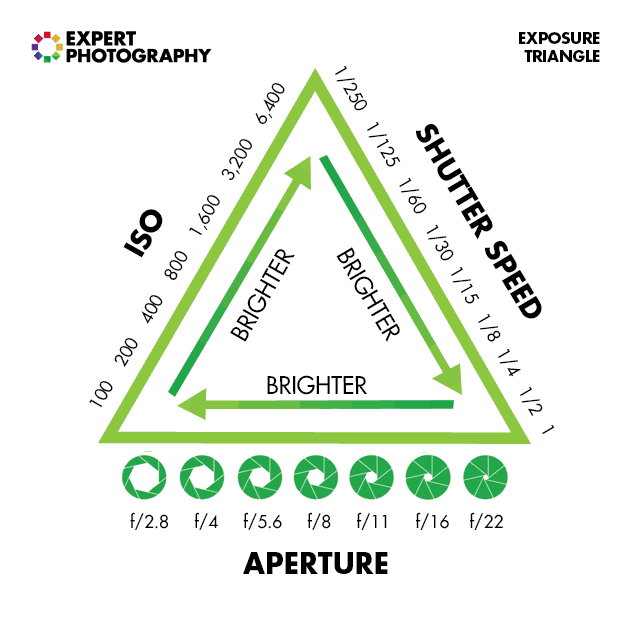
Exposure works in three parts: aperture, shutter speed, and then ISO. But what is ISO?
ISO is a measurement system that standardizes how “sensitive” your camera film or digital sensor is to light. This creates uniformity across brands and cameras and allows photographers to use it to achieve the perfect exposure. Basically, it’s extremely important!
Continue reading to learn what it is, what it isn’t, and how to use it to perfect your photos!
What Is ISO in Photography?
ISO is one of three elements in the exposure triangle. Along with aperture and shutter speed, ISO is one of the key settings photographers use to get the perfect exposure.
ISO is an important parameter that determines how bright your image will be. It’s helpful because it gives photographers an extra setting to manipulate their exposures.
It gets its name from the International Standards Organization, which set this standard in 1988.
ISO works differently in film and digital cameras. In this first part of the article, we’ll discuss ISO in digital cameras. But we also take a brief look at ISO in film photography at the end of the article.
Unlike shutter speed and aperture, ISO doesn’t change the amount of light coming into the camera. Rather, it determines how the camera deals with the light the sensor receives.
Essentially, the ISO determines how sensitive the sensor is to light. A lower ISO means the sensor is less sensitive. And a higher ISO setting makes the sensor more sensitive.
But it isn’t as simple as saying a high ISO setting is better than a lower ISO. There are positives and negatives for going high or low. And different situations call for different ISO settings.
We go into more detail in the sections below. Keep reading to learn everything you need to know about ISO.
Why Do We Use ISO?
In the days of analog photography, the ISO determined how sensitive the film was to light. Camera film uses an emulsion that reacts when it’s exposed to light. This chemical reaction gives you your image.
But the chemical construction of the emulsion can be diluted to make it more sensitive to light. That means you need less light to get a fully exposed image. And films with different strength emulsions are given different ISO numbers to differentiate them.
Unlike in film photography, you can change the ISO setting of your digital camera with the click of a button. You can make the sensor more or less sensitive to light depending on your needs. That means you have more freedom when choosing your exposure settings.
You have control over the shutter speed and aperture. But you can also change the ISO setting to give yourself more exposure control. It allows you to adapt to different settings and lighting conditions.
The basic art of photography is a balancing act. You have to balance shutter speed, aperture, and ISO to create a perfectly exposed image. Of course, there’s plenty of creative freedom within that framework. But you need to understand ISO to give yourself the power to create stunning images.
How Do We Measure ISO?
We measure ISO in exposure value stops, usually referred to as “stops.” Each ISO stop is given a numerical value. Thankfully, all camera brands use the same measurement system for ISO.
A low ISO setting is 100. A medium ISO setting is 400. And a high ISO setting is 1600.
When you change the ISO setting, the sensitivity increases or decreases by 100%. That means it doubles when you change to a higher setting. And it halves when you change it to a lower setting.
If your camera is set to 400 ISO and you increase the ISO, the next stop is 800. If you want a lower setting, the next stop is 200.
This progression happens in both directions. But there are limits to how high you can go. And that limit varies from camera to camera.
Generally, we can use ISO settings from 100 up to ISO 6400 or even 25,600. This means you have 6 to 8 stops of extra exposure control. This gives you more freedom to adapt to the lighting conditions of your environment.
When setting the ISO, most cameras offer more precision than just full stops. You’re more likely to find that all exposure parameters are variable in 1/3-stop increments.
A series of ISO values in 1/3 stops from 100 to 400 looks like this:
100 -> 125 -> 160 -> 200 -> 250 -> 320 -> 400.
Changing Exposure with ISO
Let me demonstrate ISO using actual photos as you can see in the slideshow below.
The photos are displayed in the following order: 100, 200, 400, 800, 1600, and 3200. The aperture and shutter speed remain constant. Only the ISO changes so that you can see the effect it has on the photo.
The ideal exposure is shown in the fourth slide taken at ISO 800.
As you may have noticed by now, nothing affects the exposure in a single way. There are consequences to using different ISO values.
ISO and Image Quality
We know that higher ISO settings make the camera’s sensor more sensitive to light. But that extra sensitivity comes at a cost. And that cost is image quality. This is true in both digital and film photography.
A low ISO gives you less light sensitivity, but you get better image quality. A high ISO setting gives you more light sensitivity, but you lose image quality.
At higher ISO settings, you are more likely to experience digital noise. Similar to grain in film photography, digital noise degrades the image quality. It gives the image a pixelated or grainy quality. It causes the image to lose sharpness, intensity, and richness of color.
The lower the ISO, the better the image quality. Lower ISOs give you deep and rich colors. You get immaculate details, better clarity, and improved sharpness.
The problem is you need more light when using lower ISO settings. You need to compensate with slower shutter speeds and wider apertures. But changing these settings also has consequences.
You can only slow the shutter speed to a certain extent. If you go too slow, you will experience motion blur. And motion blur is a bigger risk if you’re shooting moving subjects.
The best solution for camera shake is to use a tripod. It gives you a solid base that allows you to use slower shutter speeds without experiencing camera shake.
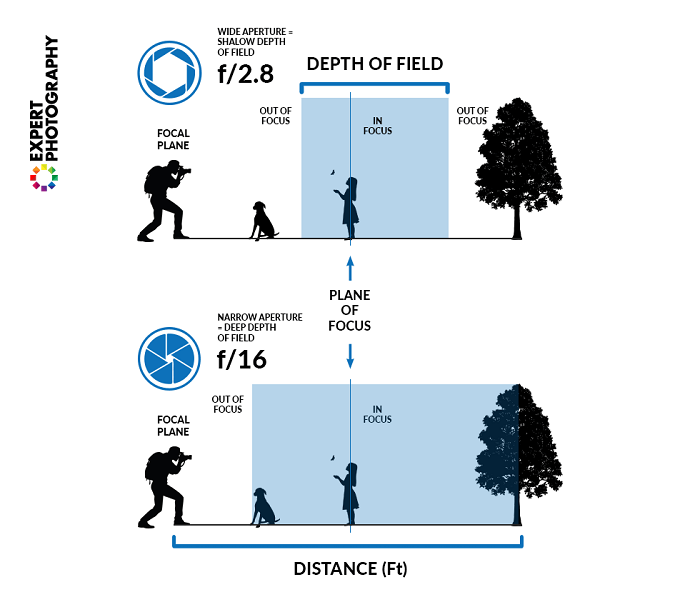
Changing the aperture also changes the depth of field. And when you use a wide (or “fast”) aperture, you get a shallow depth of field. That means only a narrow section of your scene is in focus. The foreground and background will be out of focus.
Using a shallow depth of field can give you really creative results. But a shallow depth of field might not be what you want in that image. That means you have to use narrower aperture settings.
Sometimes there simply isn’t enough light to keep your ISO low. Even when you compensate with shutter speed and aperture, you have to increase the ISO.
This is why photography is such a balancing act. When you change one exposure setting, it has an effect on the other settings. That’s why understanding ISO is so important when taking pictures.
Lower Number = Lower Sensitivity = Finer Quality Photos
To best show how ISO affects image quality, I took another series of photos and displayed them below.
For this experiment, I adjusted the shutter speed and aperture for each photo to compensate for the exposure changes. This makes it easier to compare the difference in image quality.
The photos have ISO in the following order: 100, 200, 400, 800, 1600, and 3200.
As you can see, the amount of noise in the photo increases as the ISO number goes up.
For this reason, I advise keeping your ISO levels as low as possible, as long as it doesn’t impact the image in other ways.
For example, if you need a slow shutter speed to intentionally use motion blur in the image, it’s better to use a higher ISO. Reducing noise is possible in editing software. And you can reduce it in-camera, to an extent. Correcting motion blur, on the other hand, is nearly impossible.
So, let’s talk about noise reduction for a minute. There are many kinds of noise reduction software out there. These algorithms are also built into popular post-production tools like Lightroom.
But you’ll find that this only “smooths out” the noise.
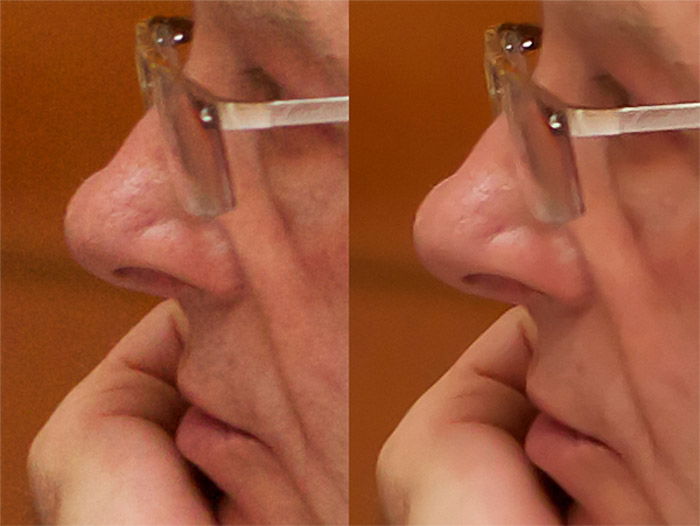
Excessive noise reduction can result in an airbrushed effect on faces. It reduces the detail and sharpness in a photo as shown below (which I cropped to show the effect more clearly).
Noise reduction has its uses. But you need to use it in moderation and in very specific instances.
How to Use ISO
It’s quite apparent that you should use low ISO in bright environments and higher ISO in darker environments.
Here’s our graphic showing how you can use ISO properly (in most situations).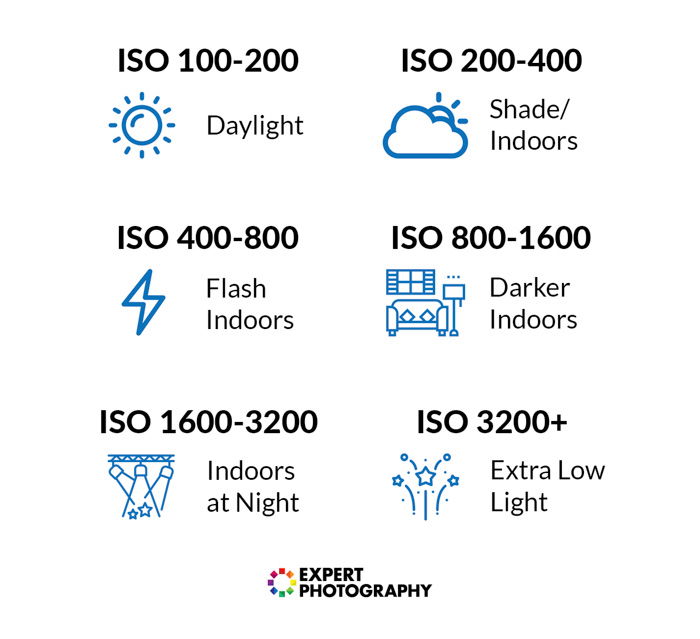
Besides the environment, you must account for your other two exposure settings and set ISO accordingly.
Let me show you a few real-life examples of properly using ISO.
Scenario 1—Travel Photography in Daylight
You’re using a 28-70mm lens at 28mm to get a wide field of view in bright daylight.
For casual street and travel shooting, you want to freeze the motion of people and avoid camera shake. This will require you to set a shutter speed of 1/250 s or faster.
You choose an aperture of f/5.6 because you want most of your image in focus.
In this case, it’s best to use ISO 100. Even with a low ISO, you might find yourself actually overexposing the image. Compensate for this overexposure by using a faster shutter speed.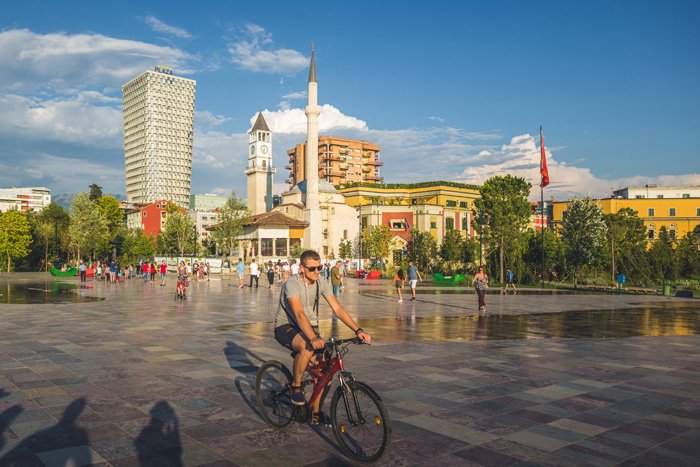
Scenario 2—Indoor Family Photos
You’re in a moderately lit room during the afternoon. There is some natural light leaking in through the windows, but not nearly as much as in the previous scenario.
You’re using the same lens, but this time at 50mm to get a clean shot of two family members. You open up your aperture to f/4 because you want the two of them in focus, but with a bokeh background.
You can slightly reduce your shutter speed because you’ll be holding your camera more steadily and your subjects will be posing. Their movement will be much more subtle. You’ll do fine with a shutter speed of 1/125th of a second.
This situation requires you to raise your ISO to somewhere between 400 and 800. Because you’re using a specific shutter speed and aperture for this shot, ISO is the setting you’ll adjust to get the perfect exposure.
Scenario 3—Concert at Night
You’re in the mosh pit of an outdoor stage at a concert. The musicians are well-lit, but they’re moving quickly. You choose to use a longer lens—85mm at f/2—to separate one of them and get a clean image.
You’re limited to 1/400 s in shutter speed because you don’t want motion blur.
The lights are changing quickly in intensity. You shoot when the performer you want to capture is brightly lit and the background is quite dark.
To get the correct exposure, you’ll need to choose a high ISO setting. This can be anywhere between 1600 and 4000. You’ll get plenty of noise in the background, but your subject will be exposed correctly.
Scenario 4—Shooting Wildlife in Overcast Weather
In this scenario, you take an adventure to capture some wild birds. You grab your 100-400mm lens, which isn’t fast but reaches far. The day is overcast. There is plenty of light, but not as much as if it was direct sunlight. You like this better because animals look great in soft, diffused light.
To freeze the motion of a bird taking off close-up, you’ll need to choose a very fast shutter speed. You’ll want at least 1/1000 s, but it can be as quick as 1/4000 s. Here, we choose the easier option of 1/1000 s.
You’re limited by the f/5.6 aperture of your lens on the zoomed-in end.
In this instance, you’ll need to use a higher ISO setting of 800 to 1600, even outdoors in the daytime.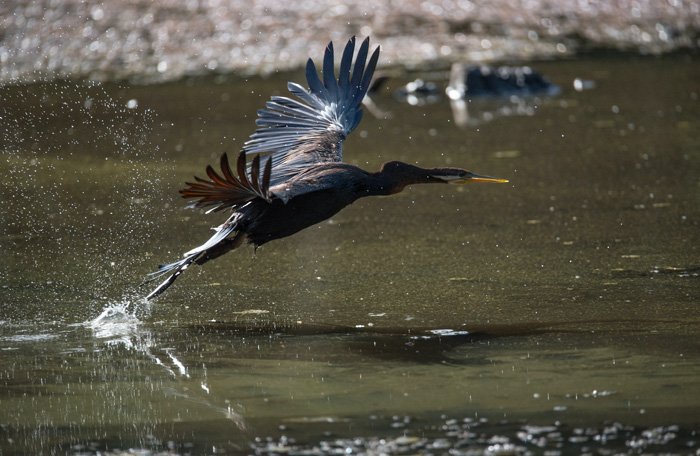
Scenario 5—Landscape Photography at Dusk
You’re in a field surrounded by beautiful mountains. You want to capture right at dusk in the last light of the day.
The light is dim, but fortunately, you have a tripod. This means you can use basically any shutter speed you want. In this shot, shutter speed will be your main variable. Your aperture is locked at f/16 to keep the whole scene in focus.
Your ISO is fixed at 100 because you want the highest possible quality and detail. Landscape images are more likely to be enlarged before printing. So this is more important than in the case of a sports or concert shoot, for example.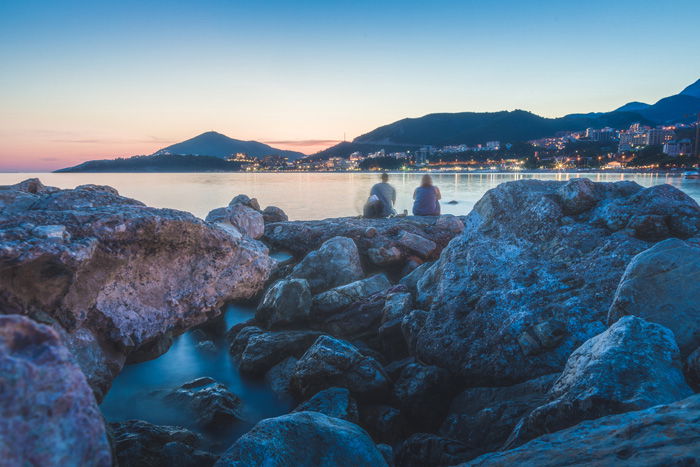
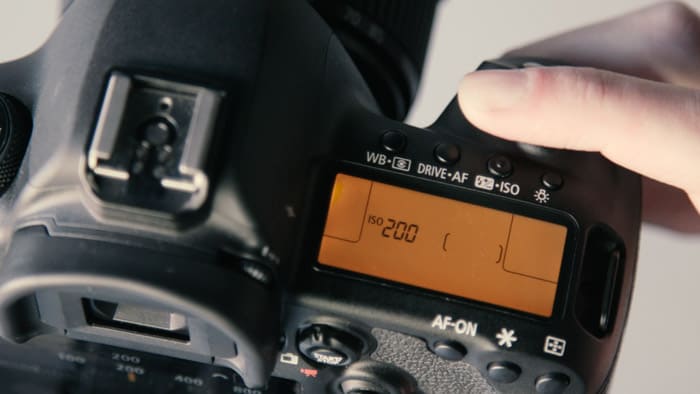
Where Is ISO on My Camera?
To change ISO, you need to set your camera to manual or one of the semi-automatic modes (S/Tv, A/Av, P).
Depending on the make and model of your camera, there are different ways of adjusting ISO.
On professional and prosumer cameras, there is always a separate button for ISO. This is because in a fast-paced professional environment, you’ll need to quickly access it.
On entry-level DSLR and mirrorless cameras, it’s usually hidden in a menu. Or it might be accessible by pressing two buttons (or dial and a button) at the same time.
On compact cameras that offer manual control, it’s also in the menus. If your camera doesn’t offer manual control, it will set the ISO automatically as well.
ISO Across Cameras
ISO noise and dynamic performance are not the same across all cameras. There are huge differences depending on age, sensor size, type of camera, and sensor technology.
Let’s start with age. ISO performance is one of the ever-evolving features of digital cameras. Every new generation of cameras brings lower noise levels, higher dynamic range, and better low-light performance.
Newer cameras give you far more stops than their precursors from a decade ago because of software and sensor developments.
The sensor size is equally important in low-light situations. Because smaller sensors get less light (with everything else staying constant), their ISO noise levels are also higher.
A full frame camera from the same generation usually performs 1-1.5 stops better than an APS-C crop model. This is 0.5 to 1 stop better than a camera with a Micro Four Thirds sensor.
Today’s modern full frame cameras give very usable images up to ISO 25,600.
The type or price of the camera is also a determining factor, although not as much as the prior two. A low-tier model, such as a Canon Rebel, won’t perform as well as a Canon 7D-series model, even if they’re from the same generation. They also have identical sensor sizes, but more money tends to buy more sophisticated technology.
How Does ISO Work in Digital Cameras?
It’s time to get slightly more technical. What does ISO mean in a digital camera, really? Most photographers will tell you that ISO refers to the sensitivity of the image sensor.
This explanation is great for simplified illustration purposes, but it’s not the full story. It is the case if you shoot film, but not digital.
To be fair, ISO does behave just as if it was changing sensor sensitivity. The higher (and more sensitive it is), the brighter the photo will be. The more voltage you send into the sensor, the more sensitive it becomes. Sounds plausible, right? It’s not.
Rather, ISO determines signal amplification after the shot has been taken. This amplification can be analog or digital, or both at the same time.
In ISO-variant cameras, full-stop ISOs are always amplified in an analog way. Third stops are differentiated with digital gain. But because the circuitry isn’t optimized for a set level of gain, these sensors generally provide a narrower dynamic range.
ISO-invariant cameras make up the majority of modern mirrorless and DSLR devices, including almost all Nikon, Sony, and Fujifilm models. These work slightly differently.
In the case of the base ISO (80 or 100 on most cameras), there is some analog gain applied, but no digital. Thus, the image will be as clean as possible when it comes to noise.
At any step above base ISO, there is digital amplification added, but not analog. This raises the noise floor, resulting in more visible noise. But because the system is optimized for a set level of analog amplification, ISO-invariant cameras are actually slightly better performers in terms of dynamic range and low-light noise.
There are some modern digital cameras that are built with a dual native ISO feature. This essentially means that such cameras have two base ISOs, which has its advantages. In most cases, these are 100 and 800. If you’re shooting at any value below 800, you get a low-level analog amplification and additional digital gain above 100.
Once you reach 800, another level of analog gain kicks in, removing the need for lower-quality digital gain. The noise floor is lowered again. As you go above 800, digital amplification is added back again, but only up from 800. The image quality is thus better at 800 than, say, 640, or even 400. This technology is a significant improvement in low-light performance.
Cameras that employ this feature are quite rare today and are mostly video cameras. We’ve seen dual native ISO on the Panasonic S1H, the Panasonic GH5S, and the Fujifilm GFX100 cameras most recently.
Is ISO the Same in All Cameras?
Most photographers assume that any given ISO value (say, 200) represents a fixed level of amplification in all cameras. This is not true.
To understand why, you need to understand how different sensor sizes influence exposure and other properties. I have written about this in great length in my article explaining equivalence.
Even though we have three variables for exposure, only one of them is an absolute value—shutter speed. Shutter speed will always be the same and will have the same effect, no matter what camera use.
Aperture is a tougher question. When we talk about f-stops, we mean relative aperture. The f-stop gives a good indication of the amount of light that falls on a specifically sized sensor at a set distance from the lens. So, it’s usable to determine exposure within a given system.
But when the goal is comparing and standardizing exposure between different-sized sensors, it’s less helpful. As I mentioned, smaller sensors get less light when using lenses with the same f-stop in proportion to their surface area.
The point of ISO is to standardize exposures between systems. An exposure of, say, ISO 100, f/4, and 1/100 s, must look identical in every camera in terms of luminance.
Consequentially, ISO values mean higher levels of amplification in cameras with smaller sensors. If we expand this, you’ll also see that higher-resolution cameras need higher amplification than lower-resolution ones of the same size. Thus, pixel-level noise is generally more noticeable in high-resolution and small-sensor cameras.
Raising ISO vs Brightening Your Photo in Post-Processing
When you step away from your camera and load the image onto your computer, you can’t raise the ISO. Editing software such as Adobe Lightroom will only allow you to interpret the digital data that’s already in there.
The exposure slider increases in points. +1 stop looks as if you collected one more stop of light. It has a similar effect in overall tones as raising your ISO from 100 to 200 would have.
Lightroom can only deal with digital data. That means tweaking exposure during editing will generally give you noisier results than correctly exposing your shot in the first place. Always aim to get the correct exposure during the shoot.
An exception is ISO-invariant cameras. With RAW files from these cameras, you’re much less limited when setting exposure after the fact. If you’re using uncompressed files, your image will almost behave as if you were changing ISO—and without much more noise!
But you’re still better off setting the ISO correctly because that makes previewing your images easier. Also, you risk building a bad habit of forgetting correct exposure, which is detrimental to your photography in the long run.
ISO in Film Cameras
As I mentioned earlier, the “sensitivity” explanation originates from the film era. When shooting a film camera, you don’t set your ISO with the press of a button.
Instead, each type of film has an ISO rating that relates to the light-sensitive emulsion layer on the film. This rating is also called film speed. And the ISO of each film roll is fixed. You can’t change it.
Depending on what you’re shooting, you choose a film that matches your sensitivity needs. For daylight, you use ISO 100 or 200 film. For indoor shoots, you generally use ISO 400 film, and so on.
When you load a roll of film into your camera, remember to change the ISO setting. This tells the light meter the ISO of the film. That way it can guide you more accurately. It also helps you remember what film you have in the camera.
You will find that both film and digital photography have increased noise levels at higher ISO settings. However, film noise, or film grain, is generally considered to look pleasing. And I have to agree with that.
While digital noise can lower the quality of your image, film grain adds a texture that many photography fans love. The film aesthetic is something people are trying to recreate digitally these days.
Experimenting with different film speeds is part of the fun of film photography. There are so many film stocks to try in both color and black and white.
If you’re interested in film photography, check out our list of the best color film stocks. Or if you want to go monochrome, here’s our article on the best black and white film.
A Short History of the ISO Standard in Photography
The International Standards Organization (ISO) is an international body composed of representatives from various national standards organizations. This is where the name ISO comes from. It was formed in 1947 and its headquarters are in Geneva, Switzerland.
Ever since photographic emulsion was developed, different countries tried to enforce standards. This is so photographers knew what sensitivity they could expect from the film.
There were multiple companies and institutions that tried to come up with a method that classified their film in the most straightforward way. This was the early process of trying to work out what we now call film speed.
Numerous standards have been developed before settling at what we know today as ISO in photography. The most notable of them are the following:
- Hurter and Driffield—These two worked on emulsion sensitivity since 1890. And it was the standard until 1928. Their system had an inverse system of classification and exposure. The higher the number, the lower the exposure the emulsion needed.
- GOST—From 1951, the Soviet Union used this as their standard measurement system. They then replaced it with the ISO system in 1987.
- DIN—Deutsches Institut für Normung was introduced in 1934. They used degrees for classification. A 3-degree change would either double or halve the sensitivity.
- ASA—American Standards Association started in 1943. A linear scale showed that 400 ASA is twice as fast as 200 ASA and 100 ASA is half as fast as 200 ASA. These film classifications were kept when the world adopted the ISO photography standard in 1988.
Conclusion—What Is ISO?
I hope this article has helped you understand ISO on your camera.
I recommend practicing manual control of the camera as much as you can. Being able to instinctively adjust all the basic exposure settings will open up new ways to shoot. I can promise that!
Once you no longer have to think about all the basic stuff is when your photography really takes off.
For photography facts on the go, don’t miss out on our Quick Capture Cheat Sheets!