So you’re here because you have no idea what a polarizing filter is. Or you have one, but have no idea how to use it, and what for.
You’re in the right place. We won’t only tell you what a polarizing filter does, but how to use it to get the best from your photographs.
Why You Should be Using a Polarizing Filters
Polarizing filters are one type of lens filter. It is a worthy addition to your camera gear as it is great for shooting in direct sunlight.
They remove glare from nonmetallic objects. This, in turn, creates more naturally saturated colors.
The effect created by a polarizing filter is one of the only ones you can’t replicate in post-production.
What Is a Polarizing Filter?
There are two types of polarizing filters; linear and circular.
Photographers use linear filters for film photography. And circular polarizer filters for digital. Circular filters will not confuse your digital camera’s autofocus.
When you attach the circular filter to the end of your lens, you can still rotate the filter. This changes the direction in which the light is polarized.
What Do Polarizing Filters Do?
When shooting in direct sunlight, you’ll often find that your images come out harsh with an overexposed feel. Think about when you’re in the sun with no sunglasses on. It’s hard to see, right?
Polarizers work by only allowing in light from a certain direction, removing glare from photos.
Have a look at the photos below. The first was taken without a filter and you can see the sun reflecting off the road.
This has overexposed the whites. It makes finer details harder to see, decreasing the overall quality of the photo.

Now have a look at a similar photo below, but this time I used a polarizing filter.
It has removed the glare from the road and you can make out the whites a lot better. The left shoulder of the subject has much more detail too.
There is now a distinct difference in color between it and the road.
The polarized photo is much easier to look at.

Polarizing filters also remove haze from photos. This is the most obvious when taking a photo of a distant subject or scene. It makes the sky look much more blue and all the colors more vibrant and saturated.
Have a look at the 2 photos below – only the second is polarized.


How to Use a Polarizing Filter
Polarizing filters produce their best results when they’re 90° from the sun. This is a great way to get the best from your filter.
But you need to be careful when taking a photo of a wide angle scene as the sky’s polarization isn’t even. You’ll start to see a change in the blue color as it gets farther from the sun.
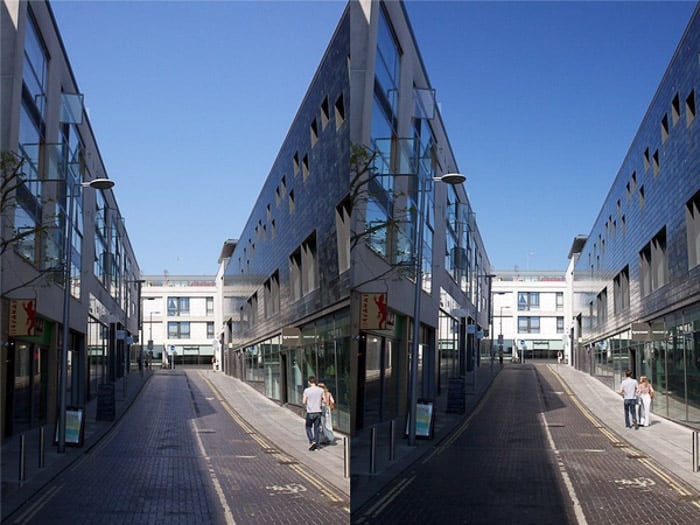
The filter has the least effect when the sun is behind the lens as demonstrated below. I only used a polarizing filter for the photo on the right.

Polarizing filters are usually quite thick and tend to darken your image. To account for this, make sure that your shutter speed is still high enough to take the photo handheld.
These polarizing filters work best when in direct sunlight so this shouldn’t be a problem. If it is, I recommend increasing your ISO from 100 to 200.
It’s important to make sure that you don’t confuse your auto white balance by adding a dark filter. Make sure you set it to daylight so that it knows the result that you’re looking for.
Polarizing filters only work in sunlight. Put the filter away at night and on overcast days. Be careful that the sky doesn’t come out too dark – an easy mistake to make with a polarizer.
Examples
Have a look at the photo below, the result of the polarizer is quite extreme and makes the photo look unnatural.
This can create a pretty cool effect but it’s sometimes best not to use a filter.

Of the photos below, the image on the left is not polarized. The reflections from the ground actually add detail to the photo.
The photo on the right which is polarized is darker and harder to see.

You can use polarizing filters to remove reflections from glass and water. They are very effective at this.
A lot of photographers use them when taking photos of lakes as they allow you to see much farther in.


Finally, it’s important to have your circular polarizer filter correctly orientated. Have a look at the two images below.
The one on the left hasn’t been rotated correctly and you can see an obvious fade in the sky.
Whereas the photo on the right, which has been orientated correctly, looks much more natural.

What to Look for When Buying Polarizing Filters
- Right Size – Have a look on the end of your lens or on the inside of your lens cap for size.
- DSLR = Circular – If you’ve got a digital camera, make sure it’s circular polarizing.
- Quality – There’s no point in buying a $1500 lens and putting a cheap piece of glass in front of it. I use high-end Hoya filters.
- Case – Buy a case to put it in when you’re not using it to save your filter from dust and scratches.
Once you have a polarizing filter, it’ll amaze you with its versatility. Have you ever heard of photoelasticity? All you need is a laptop or tablet, some plastic, and your polarizing filter, and you can create stunning rainbow effects.
And check out this video before you go.
