Time-lapse photography is a way of showing the change in an environment over time in a fraction of the time it took to change. It’s basically a fast-forward movie, or the opposite of slow motion. A time-lapse video typically shows hours or even days worth of time in about 10 to 20 seconds.
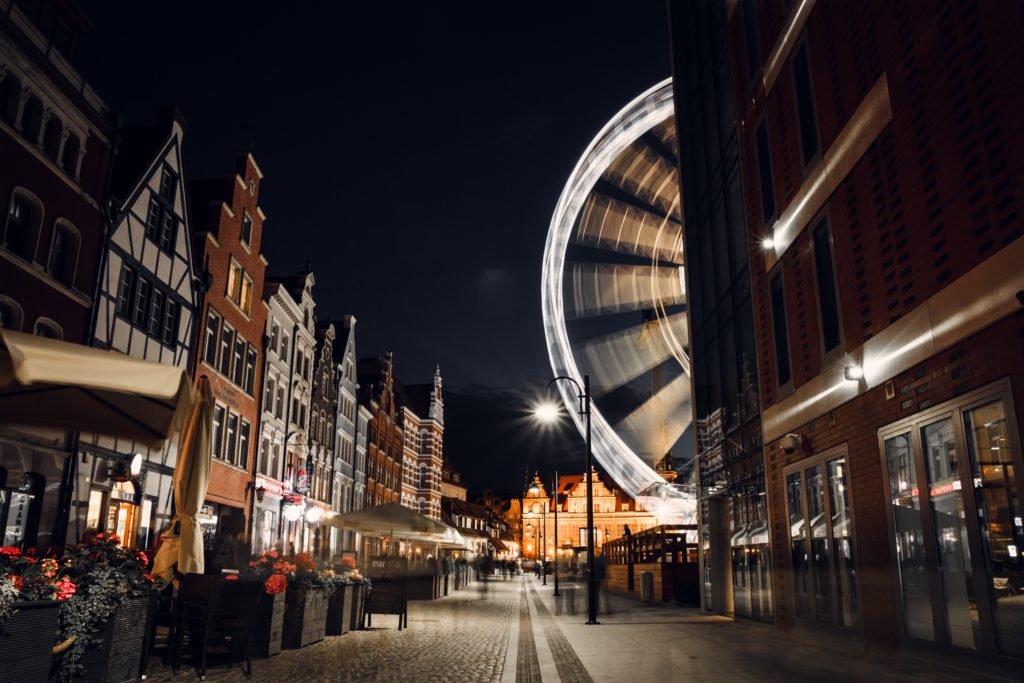
Here’s a time-lapse example from my trip to New Zealand in December 2015:
Compared to shooting images, time-lapse photography requires more knowledge and patience. You may find it overwhelming at first, but it is definitely worth learning.
Essentially, time-lapse photography is a video, or a compilation of thousands of still shots. Just like the picture flip books from your childhood, when you play a series of images within a very short time, it becomes a video.
A time-lapse video is a compilation of a sequence of photos taken over a long period of time.
Time-Lapse Photography: To Begin…
Your first task in creating a time-lapse photography video is to calculate how many frames you need for the video. Normal video is shot at 24 frames per second; you need 24 photos to create 1 second of video.

You may want to use up to 30 frames per second, but of course you’ll need to shoot a lot more frames. It seems like a lot, but your camera can do most of the work for you.
Interval Between Shots
When shooting a time-lapse sequence, you have to decide the interval between each frame.
Intervals can vary widely, depending on your subject. For example, I will use a 2-5 second interval when shooting a fast moving subject like daytime cloud changes, a 10-15 second interval when shooting a longer period change like sunrise or sunset, and a 30-40 second interval when shooting slow moving subjects like stars or the Milky Way.
There are two main calculation methods to determine your interval between shots and time required: interval based calculation and total time based calculation.
Interval Based
With an interval based calculation, you decide the interval of frames and the length of the video first. From that, you can calculate how many frames you need and the total time you’ll need to shoot.
If you have a rough idea of how fast your scene is moving, you can estimate the length of your interval. With a fast moving scene, like a moving cloud, you need a short interval; about 3 seconds. For a slow moving scene, like moon rise, use a longer interval; around 20 seconds.
Once you determine your interval, you can then calculate the total time you need to shoot to create a video of your desired length.
Let’s say you want to create a 15-second time-lapse video, using 24 frames per second, with a 3-second interval.
First, you need to figure out how many frames you will need:
24 frames per second x 15 seconds = 360 total frames
From this you can calculate the total time you’ll need to capture 360 frames:
360 frames x 3 seconds = 1080 seconds, or 18 minutes
You will need 18 minutes of shooting, using a 3-second interval, to create a 15 seconds video.
Total Time Based
Total time based calculation is the opposite of interval based. You are going to calculate the interval required to capture a certain time range for you desired length of video.
This method is great when you have an idea of how long you are going to shoot.
For example, you want to shoot 2 hours of sunset and make it into a 15-second video, using 24 frames per second.
Again, you need to know how many frames you’ll need:
24 frames per second x 15 seconds = 360 frames
Then you can calculate the interval between shots:
2 hours, or 7200 seconds / 360 frames = 20 seconds between shots
You should set a 20-second interval to capture 2 hours of sunset in a 15-second video.
Shooting Setup
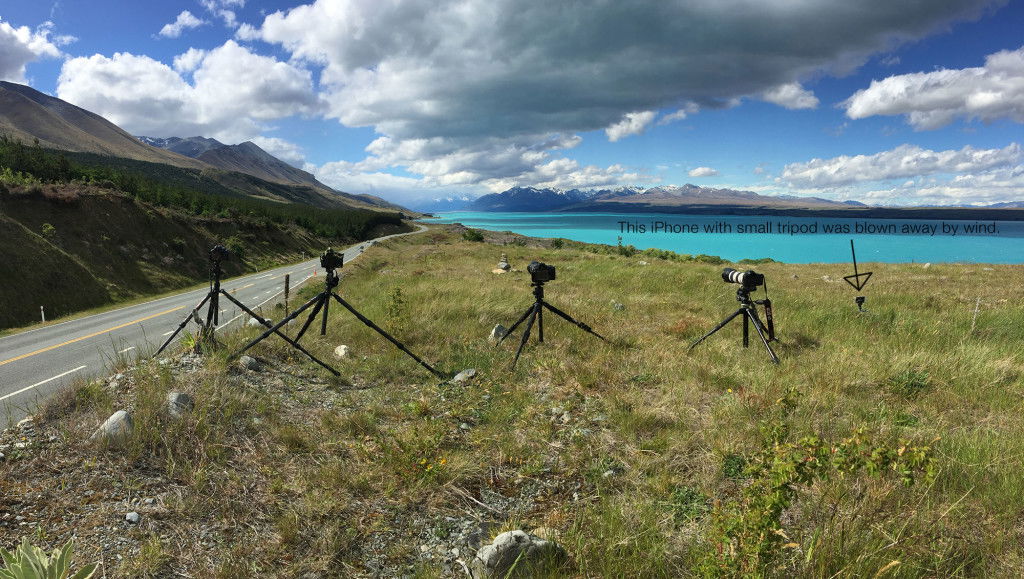
When shooting time-lapse photography sequences, a tough tripod is a must.
You’ll be shooting for hours and your camera cannot be moved. Any movement, or even vibration of your camera can ruin your video.
During my trip to New Zealand, my friends and I set up 5 different cameras to capture the cloud movement in Mt. Cook. The smallest camera, an iPhone on a flimsy tripod, was blown over by strong winds and captured nothing.
You will also need a shutter control tool. Most newer model cameras come with an interval shooting function. If not, you will need an electronic shutter release cable that can release the shutter continuously.
Shooting Mode
With your interval timer ready and your camera set on a rock-solid tripod, your next step is to select your shooting mode.
The light conditions of the environment you are shooting will determine which mode you use, either Manual or Aperture Priority mode.
Manual Mode
If you are shooting in an environment with a fairly constant light condition, I suggest using M mode.
If you plan to shoot cloud movement for 30 minutes in the morning, the light condition will not change very much over the course of your shoot. You can shoot in M mode so the entire sequence will be shot with the same exposure.
Aperture Priority Mode
However, if you are shooting in a light-changing condition like sunrise or sunset, you’ll want to use A Mode. A Mode allows the camera meter to choose the right exposure for each interval during the 1-2 hour shoot of rapidly changing light.
Time-Lapse Photography Post Processing
Once you’ve shot all your frames, you can put them into a video. But to make a great time-lapse video, some post processing is needed.
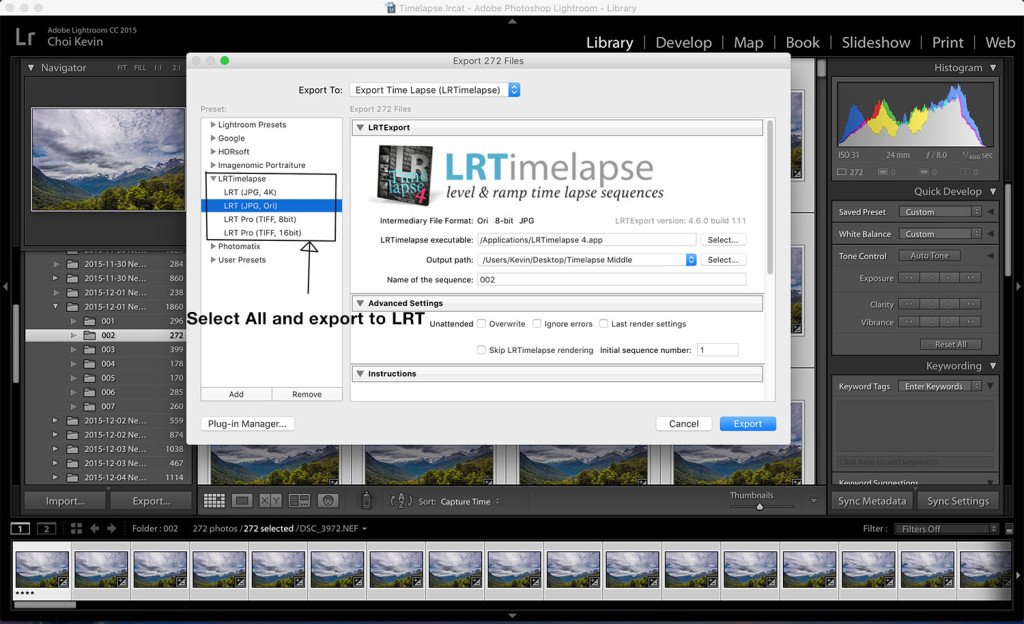
I suggest using both LRTimelapse and Adobe Lightroom to do your post processing.
LRTimelapse is a plug-in that is used in conjunction with Adobe Lightroom to create time-lapse videos. It also calculates exposure changes in a sequence and balances light changes smoothly.
The free version of LRTimelapse can render a 1080-second video with up to 400 images, which is more than enough for most photographers. There’s a paid version if you need higher resolution or more sequence images.
Using this software, here are two basic post processing methods:
Editing Sequences Shot with M Mode
For sequences that were shot using M mode, editing is rather simple, since the exposure is about the same from beginning to end.

Edit the first image of the sequence to your liking, and then simply synchronise your edits to the entire sequence.
You can render it via the LRTimelapse export dialogue.
Editing Sequences Shot with A Mode
Editing time-lapse videos of sunrise and sunset is quite different. During these times, not only does the exposure change, but the color temperature changes as well. To create a smooth video, use LRTimelapse to help you calculate the changes. Below is the workflow I normally work with.
Import the sequence to Lightroom
Import your sequence into Lightroom as normal. To enable LRTimelapse to recognize your sequence, save the sequence in a folder and remove all unwanted frames in the folder.
Use LRTimelapse to set keyframes
Next, switch into LRTimelapse and open the folder you saved. LRTimelapse will then load your sequence automatically.
After loading, select basic workflow and click on Keyframe Wizard.
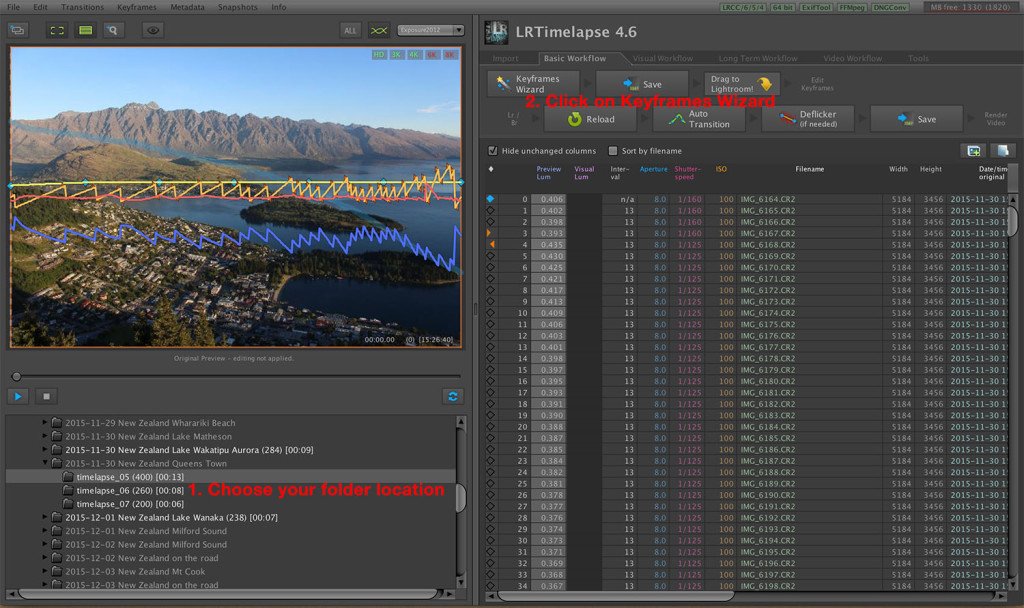
The number of keyframes you choose depends on the length of your video; I normally choose 3 to 4 keyframes.
Edit keyframes in Lightroom
After you generate your keyframes, head back into Lightroom and load the setting.
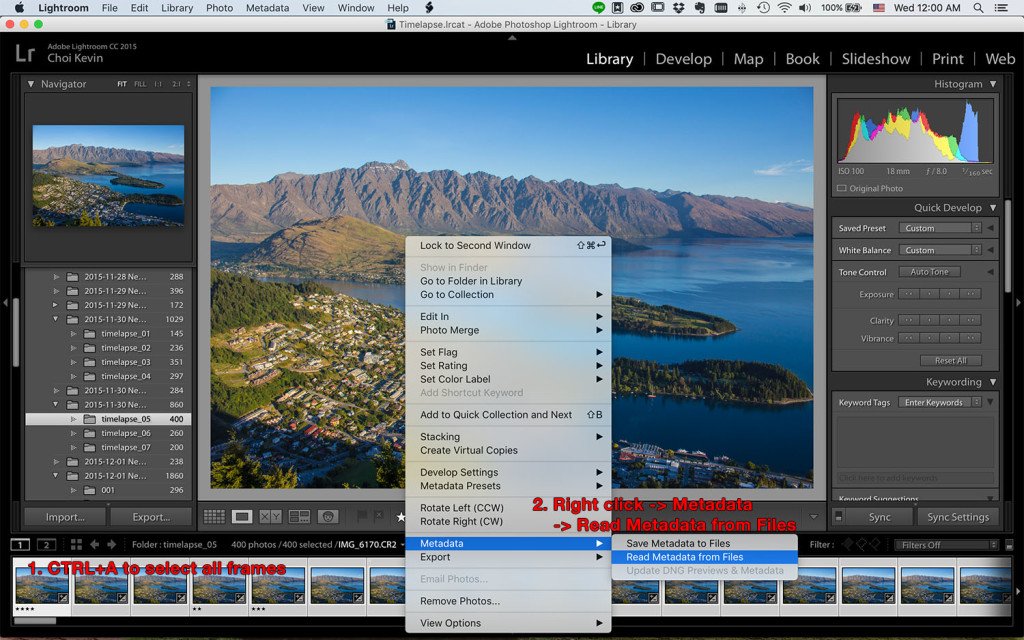
Lightroom will then read the setting that LRTimelapse made. You’ll see some of the frames have been star rated. 4 stars are those keyframes.
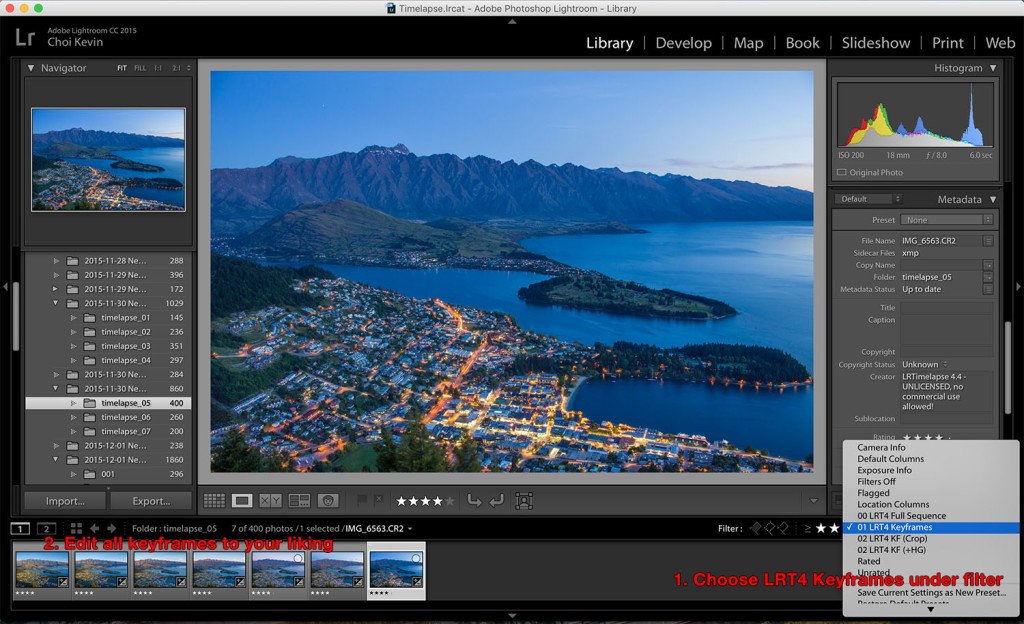
Export the edited keyframes to LRTimelapse
After you’ve finished editing all the keyframes, you can send them back to LRTimelapse to calculate transition.
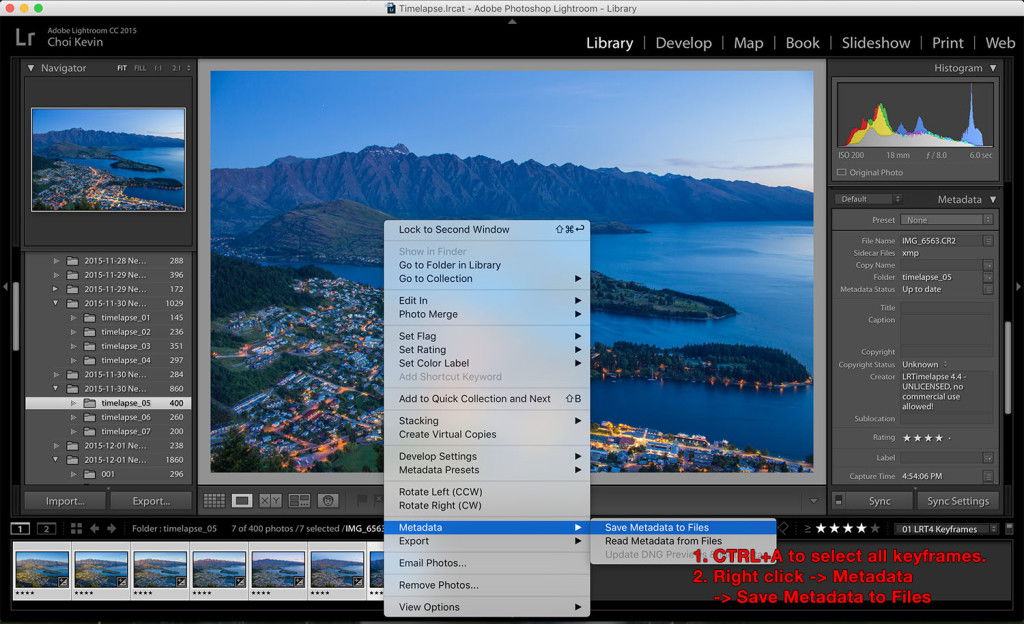
LRTimelapse will calculate the changes automatically and create XML files
After you save the edit, go back to LRTimelapse. Click the 4 buttons to calculate transitions and deflicker.
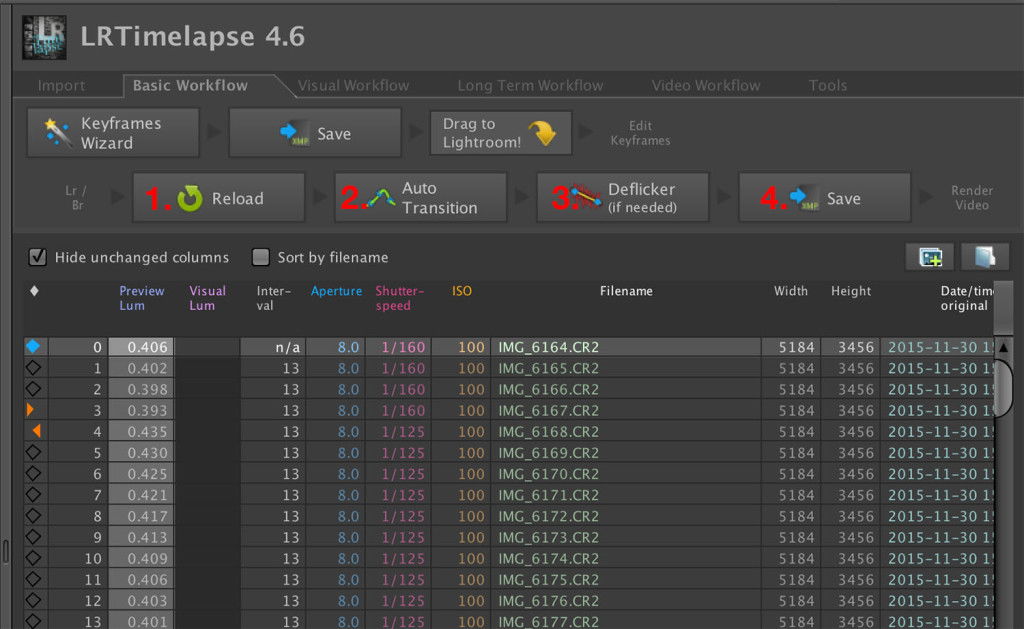
“Reload” loads your keyframe edits into LRTimelapse.
“Autotransition” calculates changes and smooths transitions.
“Deflicker” reduces flickering of your video.
And finally save.
Import XML files into Lightroom and Render Video
After you save your work in LRTimelapse you can go back to Lightroom and reload metadata again by selecting the whole sequence. (This is same as step 3)
You are now ready to export the video and view your time-lapse photography!
We have a great article on using dolly zoom or creating motion blur in time-lapse photography you should check out too!