Cameras are complicated, but photography for beginners doesn’t have to be. When I first started shooting, I was frustrated with my first DSLR. I couldn’t capture what I saw through my viewfinder.
It took a ton of trial and error to improve my photography. But when I managed to work it all out, I started taking some pretty spectacular images. So this photography for beginners guide will share everything I’ve learned from my mistakes.
Photography for Beginners
We’ll go over some camera, lens, and composition basics. Plus, we’ll look at some photography terms and suggest some equipment to get you started.
- How Do Cameras Work?
- Finding a Camera
- Understanding Your Camera
- Understanding Your Lens
- Composition and Taking Sharp Photos
How Do Cameras Work?
As beginner photographers, we tend to be visual learners. And it’s my job to make beginning photography as easy as possible for you.
So I thought, “What better way to help beginner photographers learn how to use their cameras than by creating an infographic?” And that’s exactly what I did.
I collaborated with an illustrator friend, and together we made these images. The following will make understanding exposure and how cameras work much easier!
Check out what we came up with below.
Exposure
For those beginning photography, exposure is key to capturing a great image.
Learning how exposure works will help you take control of your camera and take better photos. Shutter speed, aperture, and ISO are the elements that combine to create an exposure.
The exposure triangle is a great way to remember the three settings. Combined, they control the amount of light captured from any scene.
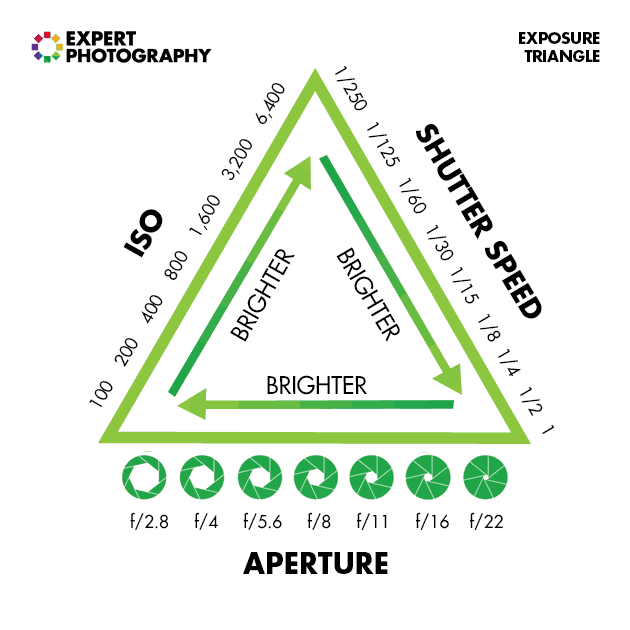
This will help you understand that changing one setting will require changing the others. That is if you photograph the same scene with the same lighting conditions.
As you’ll soon learn, these elements affect more than exposure. They also cause alterations in depth of field, motion blur, and digital noise.
You can dive into manual settings once you understand how each one works. This is where you take control back from your camera. So let’s explore exposure in the three settings we’ve mentioned
1. Aperture
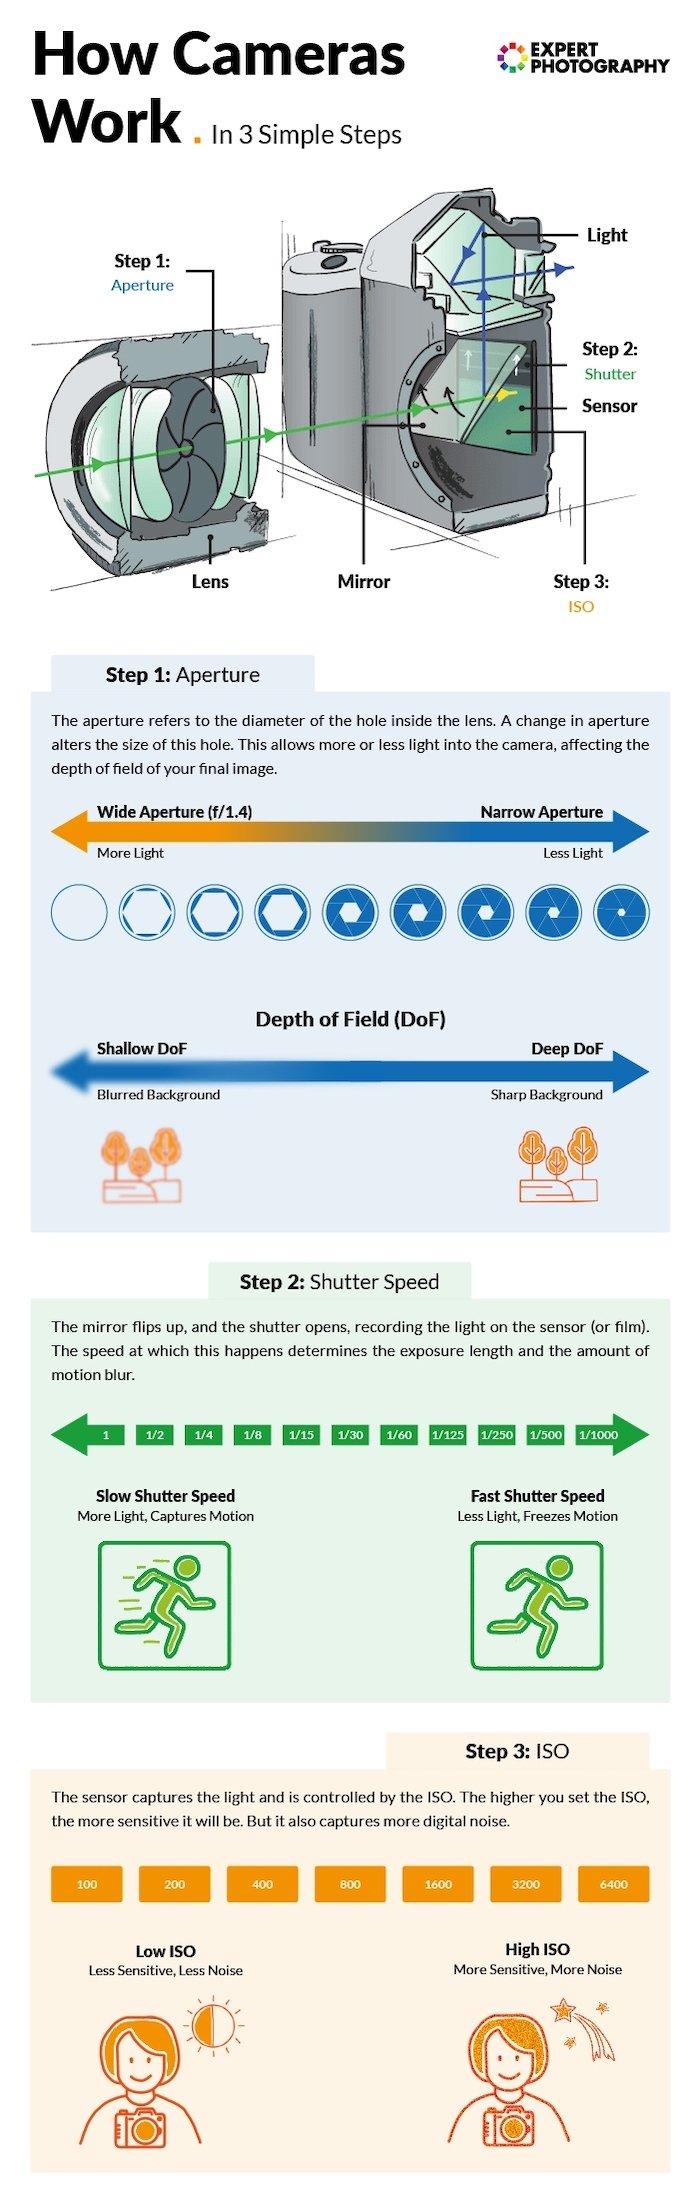
This is a summary, but I go into full detail about it in our post on aperture. And we will start with the aperture. This is the hole inside the lens through which the light passes.
It’s similar to the pupil of your eye. The wider the aperture, the more light is allowed into the camera, and vice versa. Simple? Not quite.
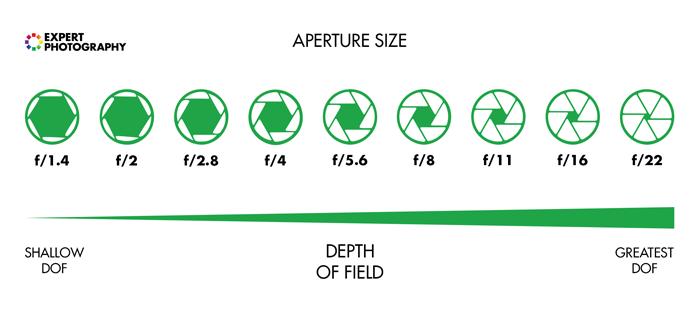
As the aperture widens, the f-number gets lower. And more light is allowed into the camera. This is great for low light. But it makes the field depth very shallow and is not ideal for landscape photos.
The aperture is the preferred setting to set first, as it directly influences how much of your scene is in focus. But, if you want to create motion blur, it is second to the shutter speed.
Exposure will be much easier if you can memorize the f-stop scale. A standard scale is f/1.4, f/2, f/2.8, f/4, f/5.6, f/8, f/11, f/16, f/22. Some specialty lenses go above and below this scale.
2. Shutter Speed
Once the light has passed through the lens’s aperture, it reaches the shutter. Now you must decide how much light you will allow into the camera.
Ordinarily, you only want a very small fraction of a second (for example, 1/250 s) to prevent motion blur. But different shutter speeds complement different situations.
Shutter speed can be anything from really fast (1/4000 s) for sports photography to really slow (30 seconds) for night photography.
It all depends on what you’re shooting and how much light you have available. That’s why knowing how your shutter speed works is a key emphasis in photography basics.

3. ISO
Once the light has passed through the aperture and is filtered by the shutter speed, it reaches the camera sensor. This is where we decide how to set the ISO.
As you turn the ISO number up, you increase the brightness. But, at the same time, the image quality decreases. There will be more digital noise or “grain.”
So you have to decide upon your priorities in terms of exposure versus the amount of grain.
For example, I would reduce the image quality if it meant that I could prevent motion blur in my photo. There’s no possible way to fix that in post-production (yet, at least).

Exposure Summary
Once you’ve understood aperture, shutter speed, and ISO, you need to learn how each element of exposure work together. Read about it in our article on the exposure triangle.
For all these basics of photography, exposure is the most important. If you don’t have this down, composition and framing become a moot point in beginner photography.
So learn the “stop-based” system for measuring exposure. And you’ll learn how to prioritize the aperture, shutter speed, and ISO for the best photo.
Finding a Camera
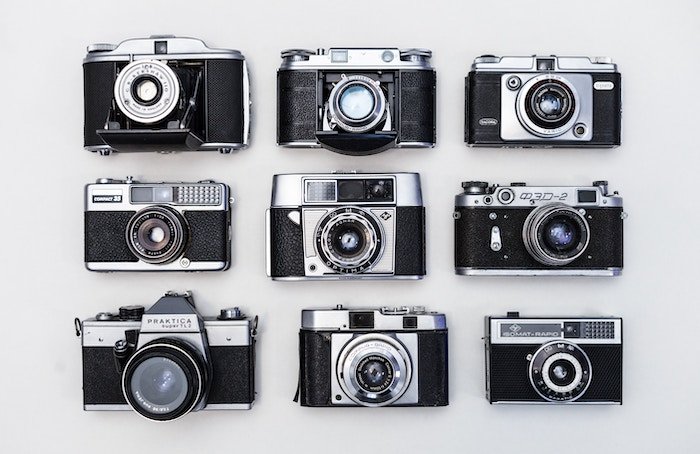
We’ll now review how to find a camera. We’ll look at camera types and features to look for. Plus, we’ll take a look at camera brands.
Finding the Best Camera
There’s no such thing as “the best camera” because all photographers are different. We all want different things from our cameras.
Finding the best camera is about finding one that helps you achieve your photography goals. Your might want to learn some camera basics and explore the art form.
Or you might be looking for a camera for a particular type of photography. Thankfully, there are plenty of cameras for everyone, from portrait photographers to vloggers.
If you’re new to photography, you can check out our list of the best cameras for beginners. As Canon is the top camera brand, you can also see the best Canon cameras for beginners.
If you’re further along, you can check out our camera recommendations for all the photography styles below.
- Best camera for portrait photography
- Best camera for landscape photography
- Best camera for street photography
- Best vlogging camera
- Best streaming camera
- Best camera for sports photography
- Best camera for wildlife photography
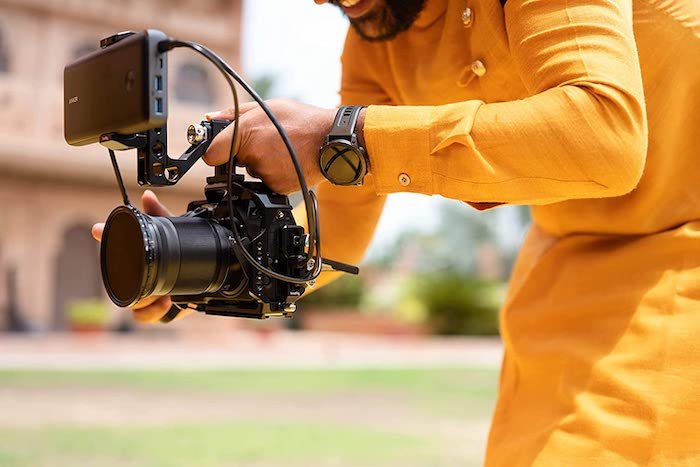
DSLR vs Mirrorless
There are two main types of cameras in photography. You have the more traditional DSLR models. And you have the newer mirrorless cameras.
You can look at the full comparison in our DSLR vs mirrorless article. But basically, DSLR cameras use the traditional shutter and mirror system of analog cameras.
And mirrorless cameras no longer use this system, which is why they are called mirrorless. Yet they are both interchangeable lens systems. So you can remove lenses and swap them for another.
DSLRs are popular with photography purists. And they are still used by everyone, from amateurs to professionals.
There’s no denying DSLRs are on the way out. But they are still beloved by many photographers. Plus, DSLRs are also a great option as an entry-level camera.
Without the shutter and mirror, mirrorless cameras have a new set of strengths. They are smaller and more lightweight than DSLRs.
Mirrorless also have faster burst modes. And they have better video features, making them superior multimedia cameras. You can see our picks for the best DSLRs and the best mirrorless cameras.
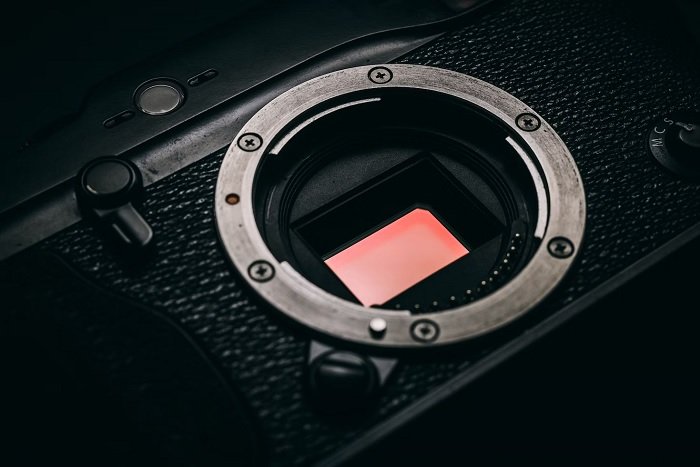
What Sensor Size Do You Need?
DSLRs and mirrorless cameras will have one of two sensor sizes. You have APS-C sensor cameras, also called crop sensors. Or you have full frame sensor cameras.
APS-C sensors are smaller than full frame sensors. This means the APS-C camera bodies are more compact and lightweight than their full frame cousins.
Crop sensors don’t have the same RAW power in terms of resolution. And they are more associated with the entry-level end of the camera market.
Full frame cameras are, in general, bigger, more powerful, and more expensive. The larger sensor size allows for a higher MP count, increasing resolution. And you also have better dynamic range.
Full frame cameras dominate the professional camera scene. Some of the specs are incredible. But the impressive tech comes with a heavy price tag.
It may be difficult to justify if you’re a beginner. But for many professionals, it’s an investment with a high return. Read more about this in our APS-C vs full frame article.
Other Types of Cameras
If you don’t fancy a DSLR or mirrorless, you have plenty of other camera types. There are compact cameras (or point-and-shoot cameras). There are even full frame compacts.
As the names suggest, they are small and easy to use. You simply point the camera and click the trigger.
They have fixed lenses, sometimes with zoom capabilities. And these cameras are favorites of street photographers.
Compact cameras are also excellent for casual photography. They are great for holidays and family events. Read our recommendations for the best compact cameras.
You also need to know about Micro Four Thirds cameras. These are also interchangeable lens cameras. But they are smaller than APS-C and full frame cameras.
They are also excellent hybrid cameras, with fab features for photography and video. Check out our recommendations for the best Micro Four Thirds cameras.
Medium format cameras have an even bigger sensor than full frame cameras. They are specialist cameras with specialist price tags.
They don’t have a full frame of features like the modern mirrorless camera. But you can’t beat them for image quality.
You can read our full article on medium format vs full frame cameras. And you can check out our list of the best medium format cameras.
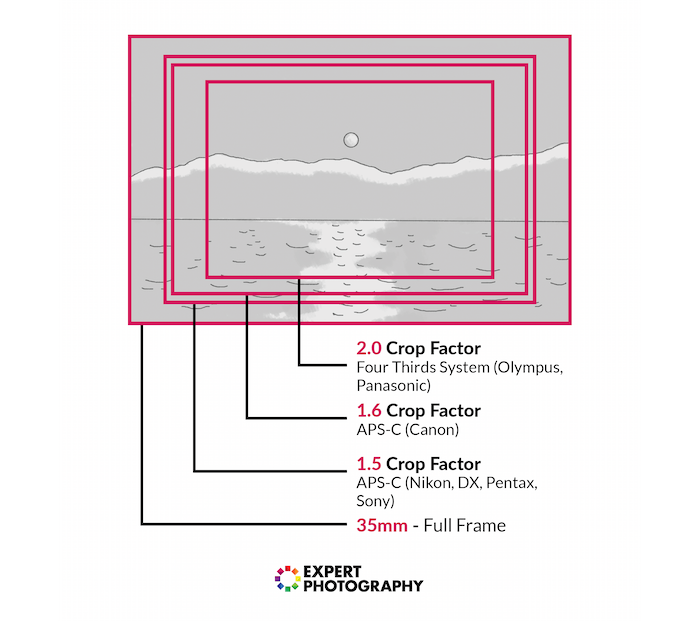
Crop Factor
There are now many cheap full frame cameras available. But many of you may not realize you’re shooting on a crop sensor (APS-C camera).
As we dsicussed, this means that your sensor is much smaller than professional cameras. So it is cropping your image. And the crop factor has a range of effects on your photos.
It creates a narrower viewing angle. And this will influence your lens purchases in the future. So beginner photographers should research camera and lenses that will help their field of photography.
Which Is the Best Camera Brand?
There are quite a few brands making fantastic cameras. You have Canon, Nikon, Fujifilm, Sony, and others turning out new models every year. That’s great for choice. But which camera brand is best?
The truth is, no one camera brand can be considered the best. It all comes down to what you want from your camera.
Some camera manufacturers specialize in certain areas. And knowing each brands strengths can help you find the perfect camera.
You can read our full article on all the best camera brands. But we’ll give you a head start here.
Nikon and Canon are two traditional heavy hitters. They produce a wide range of cameras, including DSLR and mirrorless models. They also have excellent compact cameras.
Sony is a mirrorless specialist. They have some of the best full frame mirrorless cameras on the market. Each new model redefines the possibilities and expectations of mirrorless cameras.
Fujifilm is dedicated to APS-C mirrorless cameras. They don’t have a wide range of cameras like the others. But their retro looks matched with state-of-the-art tech gives them a loyal fan base.
Olympus produces Micro Four Thirds cameras. You don’t have the widest selection of Olympus cameras to choose from. But they are fantastic hybrid machines with a wide range of features.
If you want a multimedia camera, you need to check out Panasonic Lumix. Whether you’re shooting photography or videography, they have everything you need for top results.
You can also check out the best Leica cameras if you’re feeling flush. They are one of the oldest camera brands. And they make luxury cameras photographers rave about.
They are expensive. But they have a loving and dedicated group of followers.
Understanding Your Camera
Now we’ll look at the cameras in more detail. This section breaks down some technical information. And this will help you understand some of the basic features found on digital cameras.
Why Are Megapixels Important?
A sensor’s sensitivity is measured in megapixels (MP). But what are megapixels? And why are they important in photography? Well, the amount of megapixels a camera has determines image resolution.
As a general rule, the higher the MP count, the better the photo quality. That’s because the megapixels react to light and absorb the information.
The camera’s processor then takes info from all the megapixels and turns it into an image. The more info it has to work with, the better the quality.
Other features also influence the image quality of a camera. But the MP should always be one of the first things you check in a camera. It gives you a good indication of what you can expect.
Read more about this in our aricle about resolution and megapixels.
Metering Modes
Digital photography for beginners can be confusing. Exposure isn’t as simple as learning about aperture, shutter speed, and ISO.
You also have to learn how your camera receives light. And metering modes tell your camera how you want it to look at a scene.
The picture below was taken in Spot Metering mode. If you were to take the same photo using the Evaluative mode, you would have a completely different exposure.
This is also covered in my free video training. We’ve also written an article about how and when to use digital metering modes (including Canon).
This basic camera feature is one of the keys to understanding why your photos come out underexposed or overexposed.

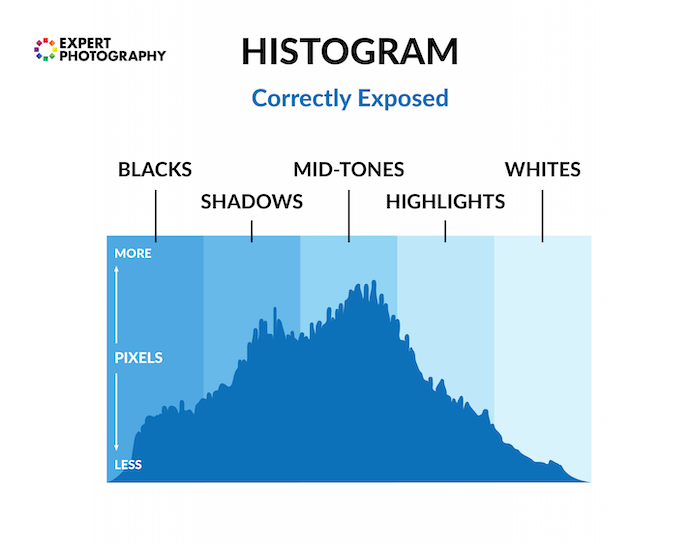
Histograms
A histogram shows you a mathematical exposure overview after taking the photo. It tells you how evenly exposed a photo is.
New photographers often find it frightening to understand. But it is easy, and I show you this in our histogram article.
LCD screens aren’t very good at showing you this information through their image display. This is because they are affected by the ambient lighting conditions you’re in and the screen’s brightness.
That’s why the histogram is a powerful tool for beginning photography correctly.
Shooting Modes
Auto, Program, Aperture Priority, Shutter Speed Priority, or Manual mode. How do you work out which one you should be using?
There are also a lot of misconceptions about which mode to use under which conditions.
When you understand what each mode does, the one that will suit your situation becomes much clearer. This is also covered in my free video training.

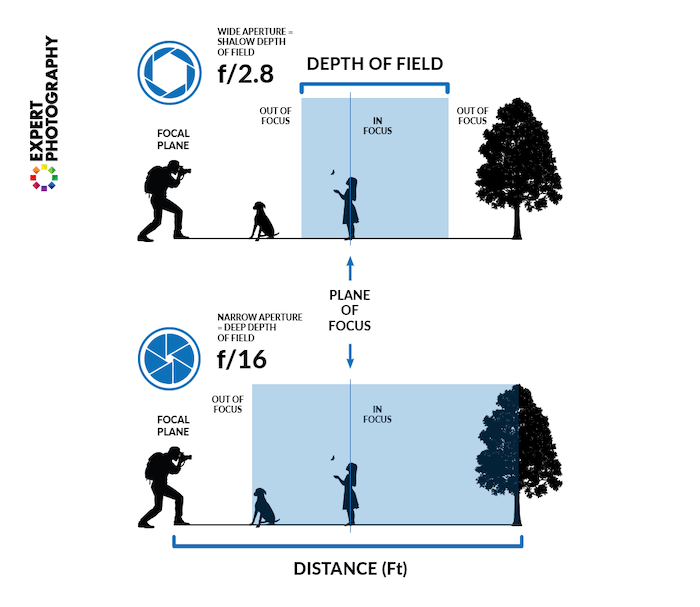
Depth of Field
When shooting in low light, you must widen your aperture to allow enough light into the lens. But this has a major side effect—a shallow depth of field.
You can creatively use this. But it’s not the only possibility.
In many situations, such as landscapes, you’ll want to use a narrower aperture. You want to use a narrow aperture to keep the whole scene focused.
Our tutorial on depth of field walks you through everything you need to know. It’s about choosing the right aperture (and the depth of field) for the right situation.
When covering all the basics of photography, depth of field is very important.
White Balance
White balance is something I wish I’d learned more about much sooner than I did. I look back on some photos now and wonder what I was thinking.
The white balance changes the color cast of the entire photo. It’s responsible for overall warmth. It can determine whether your photo appears blue or orange, cold or warm.
Auto White Balance (AWB) doesn’t often do a good job, especially with tungsten light. The sooner you learn about this basic photography principle, the more accurate your photos will look.
This is also covered in my free video training.

Understanding Your Lens
In many ways, your lens is just as important as your camera. Knowing how your lens works gives you more creative control.
And specific lenses are better for certain types of photography. Knowing this allows you to choose a lens that suits your style.
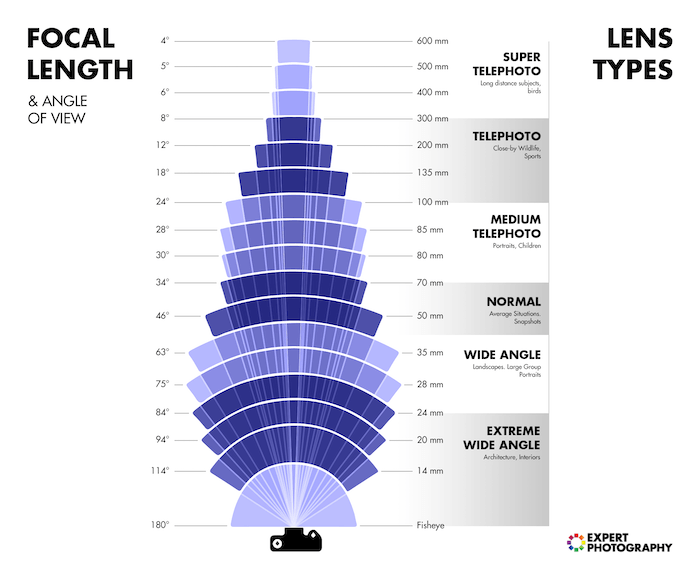
Focal Length
Have you ever wondered what the “mm” on your lens means? Or do you wonder why people use longer focal lengths for portraits?
Focal length determines the magnification level of the lens. A 35mm focal length gives you a view that’s similar to the human eye.
A small focal length, like 16mm, gives you a wide viewing angle. And focal length like 300mm gives you a high level of magnification.
if you want to know more, it’s all discussed in our post on focal length. It affects more than the “zoom.” It also influences the perspective.
We cover which focal length you want to use in different situations and their possible side effects. It’s a worthy read and one of my favorite tutorials.
Prime vs Zoom Lenses
Zoom and prime lenses are both popular with photographers. But both types of lenses have their strengths and weaknesses. Deciding between the two is about deciding what suits your photography.
A prime lens has a fixed focal length. The field of view can’t be changed, meaning you can’t zoom in or out. That’s the downside of a prime lens.
But the upsides are that they are lighter and more compact. And they often have better image quality, particularly around the edges.
Zoom lenses, with their variable focal lengths, are more versatile. You have more shot variety when shooting.
Plus, they allow you to get closer to your subject without having to move from a spot. The downsides are their size, weight, and impaired image quality.
You can read our full article on prime vs zoom lenses.
The Nifty Fifty
What can I say about the nifty fifty? What’s not to love?
For beginner photographers, I’m referring to a 50mm f/1.8 (or faster) prime lens when I talk about the nifty fifty. This can be picked up very cheaply for most DSLRs.
It’s a great introduction to buying better-quality lenses. And it’s an excellent way of getting to grips with what aperture is.
The linked article is a review and guide. I wrote it because I recommend this lens as the first upgrade for every beginner photographer to make.
It’s easy to use. And, for the price, it will yield some excellent results!

Polarizing Filters
Polarizing filters only allow light into the lens from a certain direction. This results in the removal of glare and reflections from non-metallic objects.
Water and glass are the most affected, as well as haze from the sky. Cutting out these reflections and anomalies will make for more naturally saturated colors.
This looks fantastic, and it cannot be replicated in post-production. That’s why it’s so important to understand. Another type of filter to consider buying straight-away is a protective filter.
What Lens is Best for You?
Finding the best lens can transform your photography. But, like cameras, choosing the best lens depends on the photography you want to shoot.
Certain lenses favor different types of photography. And picking one that suits you will help you succeed in that discipline.
Standard focal lengths, like 35 or 50mm, are great for street and travel photography. As mentioned, the field of view is similar to the human eye. So you can snap what you see in front of you.
Real estate and architecture photographers need wide-angle lenses. The broad field of view helps them capture expansive exteriors and tight interiors.
The same can be said for landscape photographers. They also like wide angles for capturing large open areas.
You can use 50mm lenses for portrait photography. But larger focal lengths give you tighter, more intimate compositions.
You can try anything from 70 to 120mm. These are also great lenses for product and food photography.
A fast maximum aperture is also beneficial in a portrait or product lens. It gives you excellent exposure control. And you can achieve a shallow depth of field and a smooth bokeh effect.
Sports and wildlife photographers use super-telephoto lenses. They give you excellent magnification. So you if you’re up in the stands or in the safari vehicle, you can get a close-up shot!
You can see the best lenses for each discipline below.
- Best lenses for street photography
- Best lenses for landscape photography
- Best lenses for real estate photography
- Best lenses for portrait photography
- Best lenses for product photography
- Best lenses for travel photography
- Best lenses for food photography
- Best lenses for sports photography
- Best lenses for wildlife photography
Composition and Taking Sharp Photos
It’s important to understand exposure. But if you can’t get to grips with basic composition, you’ll struggle to take really good photos.
I’m not saying that you have to follow every compositional rule. But it helps to learn these rules so they can help guide you in taking better photos.
We will also breifly touch on the importance of snapping sharp images. (Unless you want some cool motion blur in your photo.)
Rule of Thirds
This is often the first compositional rule that any beginner photographer comes across. And that’s for an excellent reason—it’s simple and works.
The basic premise is that you divide your camera’s frame into thirds. The image’s composition works better by planting key objects on these lines.
This is a tool that always works. But it is easy to overuse it. If you’ve not learned much about photography yet, it’s a great way of improving your photos. It will help to make them more exciting.
Visual Weight
Visual weight differs in size or weight as we know it. It’s all about what we’re drawn to when we look at a photo.
You’ll understand how people look at photos when you understand visual weight. You’ll learn to position certain elements in a frame to direct the viewer’s attention to where you want them to look.
It’s not so much a tool or a rule. It’s an understanding.

Triangles
Shapes are essential in photography. Triangles are in almost everything we see in one way or another. It’s only a case of distinguishing and knowing what to do with them.
Triangles make great compositional tools. They’re easy to make and manipulate and are quite common. They are a great way to create the simplest and most basic photography compositions.
They are also perfect for combining different compositional techniques. These include lines and paths to create a more interesting part of a photo.
You can even use them to make a photo feel more stable or unstable.
Eye Lines
If you take photos of people, you’re taking photos with eye lines. Understanding how eye lines affect how we view a photo is important.
Eye lines are the direction your subject’s eyes are pointed. The negative space in front of the subject’s face is called “lead room.”
These can focus our attention on a particular part of the photo. They also produce tension and other photographic elements.
They’re not physical lines. But they can be used as such to draw attention to parts of a photo. Or they can even create sense of mystery or curiosity as to what is not in the frame.

Balance
Balance in a photo affects how we feel when we look at it. An unbalanced photo can make us feel uneasy. A balanced photo will make us feel more relaxed.
Whether you choose to make the photo balanced or unbalanced doesn’t matter. But it’s best to understand why you’ve chosen one or the other.
Both affect your photos in different ways. Again, it’s one of those situations where the more you know, the easier it will be to produce the desired effect.
Take Sharp Images Like a Pro
In the article linked above, we walk you through the process of taking sharp photos like a professional. It covers everything from choosing the right shutter speed to using a tripod and shooting in RAW.
It’s pretty easy to make only a few small mistakes that result in blurry images. So we cover the 13 most important tips.
Conclusion: Photography for Beginners
So that’s a brief introduction to digital photography for beginners. But, of course, there are tons more you can learn about photography.
I encourage you to go and explore for yourself in our tutorial archive. And you can check out our video about understanding your camera. Or check out our Photography for Beginners course to master everything you need to know about taking photos!